Monday, December 21, 2009

K'nex Bridge in 3D

This bridge is from the K'nex Building Bridges set, which progressively explores a dozen bridge designs. Some of the later ones are more impressive, but I was more interested in making a stereograph than a bridge.

If you look at these images with a stereo viewer or by merging the two images with a free-viewing technique, it will be in 3D, ala the View-Master many of us enjoyed as kids, and some of us still enjoy.

No big whoopee, but this is my absolutely first stereo pair, so I am kind of pleased.

I used my regular camera, moving it to the side between exposures to create the divergent points of view.

The Manfrotto Modopocket may be my favorite camera accessory. For the stereograph (3D image pair), I put a metal ruler with a non-slip cork back on the table with the ends weighted, put the Modopocket against the ruler, and displaced it to the side along the ruler to create spaced parallel images for manipulating into a stereo pair.

For more on 3D photography, you might start with DrT's website.

Much fun.

And another way to enhance what was already good block play.

Addendum [12/24/09] - In my confusion, I had originally referred to the technique for viewing my image pair as using the "cross-eyed technique," which Dr T was kind enough to gently point out was wrong, since that requires a reversed stereo pair. I have corrected both the terminology and the link above.

Thursday, December 10, 2009

Frontier Logs

Okay, I admit to being in a rut. This is another design from the LINCOLN LOGS Building Manual, by Dylan Dawson. But this time it is using Frontier Logs, and shows some modifications because of that.

Frontier logs are round, without the top & bottom flats of modern Lincoln Logs (I call this "lantern-shape," because the crossection resembles the shape of the glass globe of an old railroad lantern - circular for most of the circumference but spreading outward towards top and bottom to allow flats at top and bottom - some paper lanterns also have this shape). Okay, some of you are saying "modern? that's what they were like way back when!" True: most of the Lincoln Logs called "vintage" are also this shape. Before World War II, and for a while after, Lincoln Logs were round. Maybe somebody will tell me when they changed.

In any case, the design for the book shows full logs in the bottom layer of this design. I wanted to see if it was possible to build that with round logs, and after several efforts that braced the lower logs until the upper cross-members were in place, I decided that it wasn't just too much to ask of children, it was too much to ask of me.

If I seriously wanted to do this, I would make some 3/4" square, 3/8" thick, gray-painted blocks to go in the bottom notches to serve as "foundation stones." I might still do that at some point, but for today, I just used flat-bottomed half-logs, as are used in most linking-logs constructions.

I could have borrowed a plastic roof the right size from my Lincoln Log stuff, but I wanted to show that that isn't necessary. In fact, by doing mix-and-match roofs, you can get a lot more than 37 different constructions out of the book without ever changing the log-building.

Illustrations of Frontier Logs generally show alternating green & yellow roof pieces, but that bothers me, so I split them between the two sides.

Frontier Log parts in general lack the consistent dimensions and quality of finish of current Lincoln Log production, but in a way , that is part of their charm. Sort of like Roy Toy. Some manageable challenge for builders with a little experience.

I would certainly recommend Lincoln Logs for younger kids, but the alternatives can be good for older, more resilient builders.

Good Block Play.

I had this written and almost ready to post when I wandered into the living room and found Webby asleep between the book and my portable backdrop. By the time I got my camera, he had stretched and was sitting up, hence the picture at top replaces my original picture below.

Addendum [12/11/2009] - If you look at the above image closely, you can see that the single-notch-log pillars are a bit bowed. The building is still standing, but it looks precarious, and the roof has required repair. If you like to keep your constructions up for a while, this would not be a good set. Partly, it is because the notches aren't quite deep enough, so the logs beyond the notches aren't doing any of the supporting. Partly, they aren't quite accurate enough. Lincoln Logs hit on a really good plan when they put flat support surfaces top and bottom, their structures are much, much more stable.

Sunday, December 06, 2009

Nostalgia Lincoln Logs

Lincoln Logs are currently made in two series: Classic, as shown at right above, in the structure built & illustrated for Friday's post, and Nostalgia, center above.

The Nostalgia line is all wood, with dark-colored logs, and happily resembles what Baby Boomers played with as kids, except with an improved roof slat system, and the newer logs with the flat top and bottom faces.

The Classic series has lighter-colored logs, and plastic roofs and accessories. Is it possible that this is actually the kind of Lincoln Log set that young parents today remember from their own childhoods? They seem too recent to me, but I suppose it is possible.

The design is another from the LINCOLN LOGS Building Manual, by Dylan Dawson, and could just have readily been built with light logs, or the red-brown logs of an intermediate era. Old roof slats or half-logs of a contrasting color could be used if one didn't have the green roof slats shown in the book. I made a slight adjustment to use only two four-notxh (#11) logs, instead of the four in the book.

I went back yesterday & edited Friday's post to add some remarks about the Learning benefits of instruction sheets, and to sneak in an inconspicuous link to a parts lists for the above book. That list isn't entirely accurate, being based on my counting the parts as shown in the assembly drawings, which is subject to various error, but it is a start.

I am enjoying the book, and enjoying building with Lincoln Logs.

Good Block Play.

Friday, December 04, 2009

Why sample designs?

Building from an existing design and building freestyle are not necessarily the same activities. "Creative play" seems to get all the good press, so it seems only fair to say something more here about building from example designs other than "I like it."


Sample designs may be considered to serve several purposes:
  • Marketing - show how the blocks (or figurative "blocks") might look in play, to encourage purchase - typically by someone who will not actually play with them, and may not even be around when they are in play.
  • Demonstration - no matter how clever we might be, we can still miss some trick that provides for more variety, more entertainment, in constructing. Also helps those of us that need 'baby steps' to get back into something. Sometimes Marketing designs help demonstrate & vice versa, but often there is no overlap.
  • Challenge - at some point, even knowing all the tricks, we might become bored; good challenges break us out of that and keep us playing, even steer us into new creative play.
  • Ritual - this is often most important to me, since it provides a therapeutic benefit at critical times; it is almost the opposite of Challenge, in that it replaces anxiety with something perhaps akin to boredom, but ultimately satisfying.
  • Learning - a large, but often subtle, benefit of a good set of instructions is in teaching the child - or refreshing the adult - how to follow instructions, how to proceed step-by-step to accomplish a goal. The process can be more important than the objective.

Perhaps all of these fall under an overall heading of Confidence - The examples usually provide designs that we know can be built with the prescribed parts, whether harder or easier, learning or relaxation.

There can be exceptions, of course. Sometimes a building set will include plans that require additional sets - with or without a notation to that effect. Sometimes there are errors and a part or two beyond the prescribed set may be needed. Sometimes it is just a mystery.

A great example of the latter is the LINCOLN LOGS Building Manual, by Dylan Dawson. No parts lists. No correspondence of designs to currently available products. Great fun. The top image today is from & of this book.

There is also a companion TINKERTOY Building Manual.

One of the things that often amazes and worries me on Amazon.com is how often in user reviews, a reviewer will have bought the biggest, most advanced construction set of some kind for a youngster, "because you could build more/bigger things with it," then write a review complaining that the tot couldn't build the designs without help. They should have bought a smaller set for beginners, they come with simpler plans - for beginners. Then if it works out, move up to bigger challenges.

Starting with something too challenging, with an overwhelming complexity and number of parts, can turn a child off not just the toy in question, but can damage their self-confidence in much broader and more enduring ways.

Start small, move up. Make sure there are example plans for building confidence.

Have Good Block Play.

This post has been kicking around in draft form for several weeks, because it is something I wanted to refer to in other posts, but wasn't quite sure how to put together. I am probably not done modifying it, but I keep finding myself wanting to refer to it, so it is here. It will probably continue to be revised.

Addendum 12/5/09 - added "learning" bullet to the purposes, suggested by a comment from "Emmadad."

Wednesday, December 02, 2009

Ankerstein Leuchtturm

Just before I shut down & went to bed last night, I discovered new plans for Ankerstein Set 6 on Burkhard Schulz's Anker Bauvorlagen.

The downloadable PDF booklet contains three excellent plans, "Brücke - Uhr - Leuchtturm" (Bridge - Clock - Lighthouse), by a longtime friend of this site, William Seppeler of Anchor Stone Constructions.

The plans demonstrate yet again (cf the Czech Anchor site) that not everything that could be done with Anchor blocks was discovered by the Richter designers a hundred years ago. They also show that one of the key benefits of example designs is seeing ways to use components that one might not come up with on one's own.

Another benefit is of course inspiring one to build.

I began construction before the sun came up this morning.

The third plan, which suggests a harbor entrance watch tower (perhaps Italian?), is particularly compelling. I especially like the stairway turning through the building, and the sandstone arch halves used in two different orientations. And there's just enough of a bridge to win priority over the Bridge design for now.

There is a small error in the level c diagram, where a red stone at left is marked "15" but should be "19." Easily corrected when it becomes evident at the next level or blatantly obvious at the one after.

I'm not sure if this is the designers last hurrah for Set 6, since his blog has long since left me behind for bigger sets, or if we can hope for future revisits to an old favorite.

My biggest desire in plans is to see more single-box plans (actually, the only ones I've seen have been photos not plans) for the "A" boxes that are officially intended to extend a given set to the next level higher - a 6 plus a 6A makes a Set 8, add an 8A for a Set 10 - but for those of us that more often want quicker Block Play, that means that the smaller sets, the lower numbers, get satisfactory use, while the higher numbers sit neglected.

For just those rare occasions when I might be willing to tackle a three-box Set 10 construction, I can't justify an 8A, but I'd be delighted to have the opportunity to build with the different stone mix and new (to me) stones found in box 8A. That would provide a nice new and different building experience, within the familiar style and linseed-chalk-sand scent of a firm favorite among construction sets.

If you are new to Ankerstein, most folks seem to recommend starting with Set 6, except for smaller children who are better off with a Heinzelmännchen. I think that for many, set 4, followed by expansion Set 4A, to make a 6 plus a few extra stones, may be a better approach, albeit for more money and with boxes that don't conform to the 6A, etc.

If there is a better place to buy them than The ToyHouse, I don't know of it, and I'd say that even if I hadn't gotten a few freebie stones and printed materials. Woof. Please mention the Block Play blog.

Always great to be stacking Anker stones again - noting that if I hadn't had them out a few days ago, it would have taken a lot longer to get myself to try building this.

Good Block Play.

Thursday, November 26, 2009

Thanksgiving Bridge

I am often thankful for bridges, and often thankful for building toys. They are good therapy.

Holidays are stressful, so I have been doing a lot of the things that help me cope. Block Play is an important part of that, and I have been building quite a few small constructions - with Lincoln Logs or Tinker Toys. Haven't much felt like photographing and blogging them though.

This afternoon I thought I would see if I could build a bridge with the Roy Toy Deluxe set. 100% American made, and located in Machias, Maine, Roy Toys seemed a better choice for Thanksgiving than one or another of the other classic American toys, now somehow made in China.

My inspiration for the bridge was a blurred & almost indecipherable image I grabbed off the Internet a while back, showing an instruction sheet from some old construction system. Maybe Miniature Timbers? Or maybe an older set of Frontier Logs.

By the time I got it working with the Roy Toy pieces, it had strayed a long way from the long-unconsulted inspiration - which is how inspiration is supposed to work.

The bridge turned out well, I believe, though there were some photographic issues, which aren't entirely rectified in the image above. At least it shows that you can go a long way from the provided examples with this set.

I hope your Thanksgiving is, or has been, a pleasant one.

We'll be leaving soon to join my brother, sister-in-law, and mom. It may be Thanksgiving dinner with a Spanish flavor, since he owns a group of Spanish food stores, and has written a Spanish cookbook. Or maybe it will be more French, to go with his latest venture. Or maybe it will be more toward family tradition. He's an excellent cook, so it will turn out well, whichever option.

I'm taking along a couple of pocketable building sets. Maybe I'll sneak off for a bit like I used to at grandma's house.

Good Block Play.


I'm not going shopping on Black Friday, not at home, not on Amazon - but Amazon would like me to link to their Black Friday weeklong deals, and pay me a small commission for any business I send them. Might help me buy something new to blog.

Friday, November 20, 2009

Punch Bridge

This is mostly an Ankerstein construction, but the bridge is not, and that is mostly what this post is intended to be about.

In their Golden Age, many Anchor Block sets were available with metal bridge parts. Many of the online plans feature bridges.

I have various old metal bridge parts in various sets. They look old and bent and rusty. They go well with the old weathered and worn stones in those sets. They don't fit in quite so well with the new stones. I prefer to build with new stones.

One can buy lovely new reproduction bridge parts from my favorite Ankerstein source, The ToyHouse. I hope to do so eventually, shortly after winning Lotto.

In the meantime, I wanted to build more bridges. I wanted to do it in a way I could commend to my readers as readily available.

One technique is based on plastic models. I may come back to that. I have posted a picture previously.

But the other day I ran across a paper punch in Big Lots that could help me make bridges out of cardstock. If you are handy with a craft knife, you can probably build better bridges than I built. But my punch technique does work, as you can see above, and I will be using it to build more bridges. I need to get some gray cardstock that will photograph better.

Aside from that, I have been building, with Tinkertoys, Lincoln Logs, Roy Toy, and K'nex, and will be blogging some of what I have built.

Mostly bridges. I like bridges.

Good block play.

Monday, November 16, 2009

Tinkertoys & Froebel's Peas

There is an evocative feel to Tinkertoys, for adults who played with them as children. A tactile memory. A pleasure.

These may not be the colors of the Tinkertoys I best remember from my childhood, but they are the size and they have the feel.

At my grandmothers house, between the two upstairs bedrooms, there was a space that was more than hallway or landing, and less than a full room. It had a south-facing window, a chair, a small table, just enough space for a child or two to play on the floor, and a set of Tinkertoys. I played there a lot, retreating from the noise and hubub of the living room and kitchen, faintly audible voices drifting up the stairs. Tinkertoys.

Tinkertoys were invented in 1913. The story of how the inventor got the idea from watching his children play with spools and pencils on the floor has been widely repeated since Tinkertoys achieved their first success. Personally, I wonder how one makes the leap from a pencil in a spool hole to the eight holes around the circumference of the spool. That would be the more interesting story.

But again and again in reading about inventors explanations of their great breakthrough, one is stricken by how uninformed the poor inventor must have been to not be aware of prior art, yet somehow through sheer luck and fortitude invent something just sufficiently different from prior art to be patentable, and to not infringe on existing patents, if any.

Okay. They make good stories.

We don't really know that Charles Pajeau was aware of Froebel's Kindergarten, and in particular Gift 19 (the later supply-oriented "gifts" are now often called an "occupations" in contrast the earlier equipment-oriented gifts). But the Froebel Kindergarten movement was still very active in America, with a lot of activity in the Chicago area, and I suspect I recall, Pajeau's hometown of Evanston.

But whether by direct influence, subconscious suggestion, or simply prior development, we must consider Gift 19, "Peas Work," to be the precursor of Tinkertoys. As these images support, again taken from Wiebe's Paradise of Childhood, 1869, 1896, 1907.

Froebel's Peas appeared in a world prior to canned or frozen vegetables, or year-round availability of fresh, so when they spoke of "peas" they would generally be understood to be referring to dried peas. These, when softened in water, could have wires or sharpened thin sticks poked into them, and two- or three-dimensional structures created.

Tinkertoys are a better idea, and it is not surprising that "Peas Work" has been all but forgotten, and no longer plays a role in our kindergartens.

Tinkertoys would go on to be a major player for several decades, until eventually bumped down a notch by K'nex, but even yet surviving in a sturdier, larger version. There are also imitators, smaller, larger, and in-between.

Long time Block Play readers may find today's bridge familiar - it is similar to a K'nex bridge I did a while back, but less complex. Which is a major part of its appeal.

I am particularly pleased with the unit blocks as bridge piers & abutments. Unit blocks are so useful, and I find they complement Tinkertoys a particularly pleasing manner. I suppose with standard-sized unit blocks, the new larger size of Tinkertoys would be in similar proportion as my smaller blocks and smaller Tinkertoys.

Good Block Play.

Sunday, November 15, 2009

Roy Toy by the bag

I am really not good at developing my own designs, but I managed to do this. From a single set: Roy Toy's natural wood Earth Friendly 250 piece bag.

First I built the design buildings for the set (bottom image), then after an overnight break, dumped the big bag of parts out into a box lid. I played for a while with how they might go together. I got frustrated several times by not quite being able to work out how to do something.

At some point, I am going to make a few pieces of my own - from raw stock, and by adding notches to some of my extra pieces.

For me, one of the good things about Roy Toy is that the quality & consistency are not so excellent that my own unexcellent work can't fit in. ;)

First, though, I thought I should accept the challenge of seeing what I could create just with what came in the bag, as-is.

I actually enjoy the mild roughness and occasional flaw. It is made by real people without over-automation and strict quality control.

Sometimes you have to turn a piece over or swap an "identical" piece to get a better fit. But that's life in the big woods. Consider it flavor, not spoilage.

The most critical measurement for satisfactory construction is consistent notch spacing, and here Roy Toy does very well.

The chimney and doorsteps (flat beach rocks I picked up Friday) were forgotten as I finished up the house & took pictures. Consider that flavor, not spoilage, as well, please.

I actually started out thinking I would have two stories for at least part of the building. I can do that by mixing in my other uncolored Roy Toy. In the fullness of time.

This bag actually had a few more than 250pieces. The large image near the bottom of this post shows the buildings on the instruction slips (unfortunately tiny in my set, but recently replaced by a larger, improved sheet), with the parts I had left over in front.

The parts I had left over from today's house are at left . There are a bunch more medium length notched logs in the bag at left rear. I dump the common and easily distinguishable parts loose into the big bag, and sort out the similar & special parts into a couple of plastic bags that then go in as well. Sort of a compromise between übersorting and a complete mishmash.

Roy Toy also has a 250 piece bag with colored pieces, presumably having roughly the same parts mix, since it builds the same three (four) buildings. Well, the cabins shown for the two sets are different, but neither is the same as the one in the set I got, and it is "half way between" the two shown.

Creative endeavor. Good Block Play.

Addendum: I received today, by email from Roy Toy, an improved full-page instruction sheet (noted in revision above), which should make building the standard structures much easier. [11/16 14:41]

Thursday, November 12, 2009

Stump Wedgits

Wedgits in the Woods.

My Mini Wedgits 10 piece pocket subset works really well for this. I wouldn't have had anything larger or less robust with me.

Good Block Play.

Addendum: Yesterday, I mentioned Stönees rock-shaped building "blocks," and after I posted today, I realized that they might be another Block Play option to provide I useful & fun subset small enough & robust enough to carry in a pocket.

In the past I have also occasionally carried wood or plastic cubes (blank dice) in my pocket as a robust Froebel Gift 3, and have long intended to make a small set of "mini unit blocks" to be a Froebel Gift 4 for the same purpose. [17:55 11/12/09]

Wednesday, November 11, 2009

Froebel Gift 3

How many blocks is enough? How many different block shapes are enough? How fancy do the blocks need to be?

It often seems that "more is better" is the universal response - eg Legos or Archiquest. Today we look at the other end of the spectrum, and find out that - at times at least - eight blocks, a single shape, and the simplest shape, are enough.

This is Froebel Gift 3 - part of Friedrich Fröbel's conception of early childhood education, which he called "Kindergarten" and introduced to worldwide acclaim.

The Gifts were intended to be given to children as educational toys, were very carefully designed, and were supported with well-explained lesson plans.

Following the first Gift of six soft balls in different colors and the second gift of three important shapes, Froebel's Third Gift introduced block play with eight 1" cubes of wood fitted into a cubical wooden box, to demonstrate breaking up into parts and reassembly in the same and different forms.

Unfortunately, too many of Froebel's followers were too worshipful, too unimaginative, too rigid, and missed major points of his teachings entirely, and instead followed examples in the plethora of Froebelian books as if they were gospel. Froebel's approach fell from favor, and teh Kindergarten movement sought new directions.

The banishment even extended to the blocks which make up his instructional tools in Gifts 3 through 6 (the later gifts introduced more complex educational play - including the precursor of Tinkertoys, and hence K'nex et al). They were to be replaced by Carolyn Pratt's enlarged Kindergarten Blocks or Unit Blocks, based on the rectangular blocks of Froebel Gift 4 and Gift 6.

Admittedly, the rectangular blocks do make for better play, and some of the smaller blocks of Gift 5 present real problems, but there is still something important that can be gained by a block builder spending some Block Play time with the eight cubes of Gift 3.

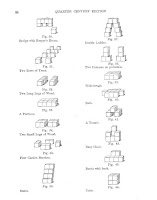
Click on the small scans here, from one of the last of the books of the Froebel Kindergarten era, and you can print out larger scans of kind of designs that appeared in ever-increasing numbers in book after book. If you get caught up in them to the exclusion of exploring your own designs, you may be a rigid Freobelian at heart, or you may be like me and just enjoying the therapeutic aspects.

Fortunately, Froebel Gifts are still (or again) available from different sources - even Ankerstein, whose popular stone blocks get their start as a development of Froebel Blocks, has a set in their composite artifical stone.

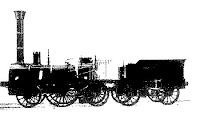
Many of the designs were passed forward from book to book, and were quite quaint by the end of the era- the locomotive here, and several other topics, was about as unrecognizable in 1907 as 2009 to Americans unfamiliar with early 19th century Germany.

For a bit of a digression, I have been admiring, but not quite buying, Stönees rock-shaped building "blocks," and it occurred to me that it might be fun to select eight of the more cubish (of a single color, for me), and see how many of the Froebel Gift 3 construction one could build. My previous Gift 3 post showed that I am not too rigid in what I use, at least.

I expect Stönees to deliver - just as Froebel Gifts long have - Good Block Play.

Sunday, November 08, 2009

Roy Toy Cabins


One of my projects this weekend was going to be building from two Roy Toy sets - first the two intended buildings, then something from them combined.

So above you see the #4 cabin and the smaller #3 cabin side by side. Well, you see them after Webster got out of the way.

But when I went to fool around with the parts, I realized that there weren't enough of the 3 1/2" #2 logs.

Umm ... I've got over 200 of those amongst my ten or so other sets ... but ... too complicated for this evening. I did quite a bit of work around the house and am tired.

So here you see the #4 cabin with an extra tier to make the doorway & windows a bit higher. The side logs of the #3 set are interchangeable with the front & rear logs of the #4.

I guess I'll be working into this gradually.

I think the concept is good, but the second set should be a fort. Experienced Block Players know that it is the little blocks that are most useful for flexibility, and the forts are full of short logs. Include a cabin or two for long logs, and something really interesting should be possible.

Another day.

What the heck - I still had good Block Play.

Addendum - In the course of cleaning up & putting things away, I fiddled with some pieces to see why they hadn't fit together very well.

It turned out that my #3 set was made with 13/32" thick parts, with correspondingly skinny notches, while the #4 has 7/16" thick parts & notches. Going through all my stuff, it would seem that there was a change from the thinner to thicker at some point, as well as a change toward lighter coloring (cf Lincoln Logs). This is close enough that fitting between the two ranges from almost to just barely - it actually would only slow down building a little, but I have enough Roy Toy to not need to mix, now that I know.

If you are buying Roy Toy now, it should all match reasonably well - though piece lengths seem to vary somewhat for pieces with the same slot spacing. Slot spacing is the critical measurement, and that seems to be sufficiently consistent for good building.

Added 13:30, 11/9/09

Wednesday, November 04, 2009

Roy Toy Wood-Links

Back during the depression, Roy Toy was one of many toy makers that sprung up, mostly to keep a business alive and employees employed.

Many of these toys have seen a rebirth in later times, out of nostalgia for classic toys and classic qualities. Some have come and gone again. Roy Toy is one of those that has stayed around and can still be purchased.

I've posted here about Roy Toys before, but it's been awhile, and I haven't posted the uncolored version.

In the meantime, Roy Toy has expanded their uncolored offerings significantly, and moved them from being a you-paint deal, to being "Earth Friendly," without the little plastic containers of paint.

I liked the unpainted ones more for their natural wood charm than for the opportunity to paint, so I never intended to paint mine. Besides being a pleasing natural color, the uncolored pieces lack the little dashed indents that were maybe intended to let the color penetrate more evenly, or maybe to sort of simulate a raw-wood appearance. The colored pieces look like they've been run through an industrial grade hyphenator.

One of my old complaints about Roy Toy was that each set seemed to have its own dimensions between notches, so you couldn't mix and match the pieces very well. In the two structures shown here, the #1 and #3 pieces are interchangeable, but the fort has a #2 that is half the length of a #3, while the cabin has a longer #2 that is sized so its notches align with the end and halfway notch of the #3.

But I apparently exaggerated the problem, and I now making measurements of the more accessible of my sets to see how much compatibility there is. So far, it looks like there is a quite useful amount of compatibility.

Roy Toy now offers some combo sets. I'd like to see what else can be built with those - and I bet the Roy Toy folks would be interested in seeing user designs as well.

My paint-set pieces were raw cut, neither sanded or smoothed, though it looks like maybe the new Earth-Friendly line is. Either way, it seems to me that these present much more opportunity for extending the set with your own pieces, since you wouldn't have to match the colors. Most anyone with a table saw could rip 7/16" thick log strips out of 3/4" boards, so an uncle could do it, and the notches could be done with hand tools - suitable for many children. Making your own round logs for other sets would require a much more sophisticated woodworker. Even with Roy Toy uncolored, I don't think anyone would want to make any quantity, the sets are too inexpensive for it to be worth the time & effort. But a few supplemental pieces might be fun.

Webster doesn't seem as impressed with Roy Toy as I am.

But I had good Block Play.

Edited 18:18 Nov 5, 2009, to correct some misperceptions. Additional corrections pending.