Monday, December 21, 2009

K'nex Bridge in 3D

This bridge is from the K'nex Building Bridges set, which progressively explores a dozen bridge designs. Some of the later ones are more impressive, but I was more interested in making a stereograph than a bridge.

If you look at these images with a stereo viewer or by merging the two images with a free-viewing technique, it will be in 3D, ala the View-Master many of us enjoyed as kids, and some of us still enjoy.

No big whoopee, but this is my absolutely first stereo pair, so I am kind of pleased.

I used my regular camera, moving it to the side between exposures to create the divergent points of view.

The Manfrotto Modopocket may be my favorite camera accessory. For the stereograph (3D image pair), I put a metal ruler with a non-slip cork back on the table with the ends weighted, put the Modopocket against the ruler, and displaced it to the side along the ruler to create spaced parallel images for manipulating into a stereo pair.

For more on 3D photography, you might start with DrT's website.

Much fun.

And another way to enhance what was already good block play.

Addendum [12/24/09] - In my confusion, I had originally referred to the technique for viewing my image pair as using the "cross-eyed technique," which Dr T was kind enough to gently point out was wrong, since that requires a reversed stereo pair. I have corrected both the terminology and the link above.

Thursday, December 10, 2009

Frontier Logs

Okay, I admit to being in a rut. This is another design from the LINCOLN LOGS Building Manual, by Dylan Dawson. But this time it is using Frontier Logs, and shows some modifications because of that.

Frontier logs are round, without the top & bottom flats of modern Lincoln Logs (I call this "lantern-shape," because the crossection resembles the shape of the glass globe of an old railroad lantern - circular for most of the circumference but spreading outward towards top and bottom to allow flats at top and bottom - some paper lanterns also have this shape). Okay, some of you are saying "modern? that's what they were like way back when!" True: most of the Lincoln Logs called "vintage" are also this shape. Before World War II, and for a while after, Lincoln Logs were round. Maybe somebody will tell me when they changed.

In any case, the design for the book shows full logs in the bottom layer of this design. I wanted to see if it was possible to build that with round logs, and after several efforts that braced the lower logs until the upper cross-members were in place, I decided that it wasn't just too much to ask of children, it was too much to ask of me.

If I seriously wanted to do this, I would make some 3/4" square, 3/8" thick, gray-painted blocks to go in the bottom notches to serve as "foundation stones." I might still do that at some point, but for today, I just used flat-bottomed half-logs, as are used in most linking-logs constructions.

I could have borrowed a plastic roof the right size from my Lincoln Log stuff, but I wanted to show that that isn't necessary. In fact, by doing mix-and-match roofs, you can get a lot more than 37 different constructions out of the book without ever changing the log-building.

Illustrations of Frontier Logs generally show alternating green & yellow roof pieces, but that bothers me, so I split them between the two sides.

Frontier Log parts in general lack the consistent dimensions and quality of finish of current Lincoln Log production, but in a way , that is part of their charm. Sort of like Roy Toy. Some manageable challenge for builders with a little experience.

I would certainly recommend Lincoln Logs for younger kids, but the alternatives can be good for older, more resilient builders.

Good Block Play.

I had this written and almost ready to post when I wandered into the living room and found Webby asleep between the book and my portable backdrop. By the time I got my camera, he had stretched and was sitting up, hence the picture at top replaces my original picture below.

Addendum [12/11/2009] - If you look at the above image closely, you can see that the single-notch-log pillars are a bit bowed. The building is still standing, but it looks precarious, and the roof has required repair. If you like to keep your constructions up for a while, this would not be a good set. Partly, it is because the notches aren't quite deep enough, so the logs beyond the notches aren't doing any of the supporting. Partly, they aren't quite accurate enough. Lincoln Logs hit on a really good plan when they put flat support surfaces top and bottom, their structures are much, much more stable.

Sunday, December 06, 2009

Nostalgia Lincoln Logs

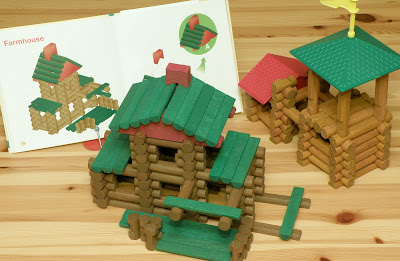
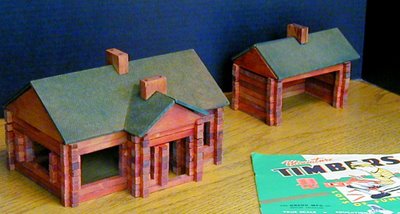
Lincoln Logs are currently made in two series: Classic, as shown at right above, in the structure built & illustrated for Friday's post, and Nostalgia, center above.

The Nostalgia line is all wood, with dark-colored logs, and happily resembles what Baby Boomers played with as kids, except with an improved roof slat system, and the newer logs with the flat top and bottom faces.

The Classic series has lighter-colored logs, and plastic roofs and accessories. Is it possible that this is actually the kind of Lincoln Log set that young parents today remember from their own childhoods? They seem too recent to me, but I suppose it is possible.

The design is another from the LINCOLN LOGS Building Manual, by Dylan Dawson, and could just have readily been built with light logs, or the red-brown logs of an intermediate era. Old roof slats or half-logs of a contrasting color could be used if one didn't have the green roof slats shown in the book. I made a slight adjustment to use only two four-notxh (#11) logs, instead of the four in the book.

I went back yesterday & edited Friday's post to add some remarks about the Learning benefits of instruction sheets, and to sneak in an inconspicuous link to a parts lists for the above book. That list isn't entirely accurate, being based on my counting the parts as shown in the assembly drawings, which is subject to various error, but it is a start.

I am enjoying the book, and enjoying building with Lincoln Logs.

Good Block Play.

Friday, December 04, 2009

Why sample designs?

Building from an existing design and building freestyle are not necessarily the same activities. "Creative play" seems to get all the good press, so it seems only fair to say something more here about building from example designs other than "I like it."


Sample designs may be considered to serve several purposes:
  • Marketing - show how the blocks (or figurative "blocks") might look in play, to encourage purchase - typically by someone who will not actually play with them, and may not even be around when they are in play.
  • Demonstration - no matter how clever we might be, we can still miss some trick that provides for more variety, more entertainment, in constructing. Also helps those of us that need 'baby steps' to get back into something. Sometimes Marketing designs help demonstrate & vice versa, but often there is no overlap.
  • Challenge - at some point, even knowing all the tricks, we might become bored; good challenges break us out of that and keep us playing, even steer us into new creative play.
  • Ritual - this is often most important to me, since it provides a therapeutic benefit at critical times; it is almost the opposite of Challenge, in that it replaces anxiety with something perhaps akin to boredom, but ultimately satisfying.
  • Learning - a large, but often subtle, benefit of a good set of instructions is in teaching the child - or refreshing the adult - how to follow instructions, how to proceed step-by-step to accomplish a goal. The process can be more important than the objective.

Perhaps all of these fall under an overall heading of Confidence - The examples usually provide designs that we know can be built with the prescribed parts, whether harder or easier, learning or relaxation.

There can be exceptions, of course. Sometimes a building set will include plans that require additional sets - with or without a notation to that effect. Sometimes there are errors and a part or two beyond the prescribed set may be needed. Sometimes it is just a mystery.

A great example of the latter is the LINCOLN LOGS Building Manual, by Dylan Dawson. No parts lists. No correspondence of designs to currently available products. Great fun. The top image today is from & of this book.

There is also a companion TINKERTOY Building Manual.

One of the things that often amazes and worries me on Amazon.com is how often in user reviews, a reviewer will have bought the biggest, most advanced construction set of some kind for a youngster, "because you could build more/bigger things with it," then write a review complaining that the tot couldn't build the designs without help. They should have bought a smaller set for beginners, they come with simpler plans - for beginners. Then if it works out, move up to bigger challenges.

Starting with something too challenging, with an overwhelming complexity and number of parts, can turn a child off not just the toy in question, but can damage their self-confidence in much broader and more enduring ways.

Start small, move up. Make sure there are example plans for building confidence.

Have Good Block Play.

This post has been kicking around in draft form for several weeks, because it is something I wanted to refer to in other posts, but wasn't quite sure how to put together. I am probably not done modifying it, but I keep finding myself wanting to refer to it, so it is here. It will probably continue to be revised.

Addendum 12/5/09 - added "learning" bullet to the purposes, suggested by a comment from "Emmadad."

Wednesday, December 02, 2009

Ankerstein Leuchtturm

Just before I shut down & went to bed last night, I discovered new plans for Ankerstein Set 6 on Burkhard Schulz's Anker Bauvorlagen.

The downloadable PDF booklet contains three excellent plans, "Brücke - Uhr - Leuchtturm" (Bridge - Clock - Lighthouse), by a longtime friend of this site, William Seppeler of Anchor Stone Constructions.

The plans demonstrate yet again (cf the Czech Anchor site) that not everything that could be done with Anchor blocks was discovered by the Richter designers a hundred years ago. They also show that one of the key benefits of example designs is seeing ways to use components that one might not come up with on one's own.

Another benefit is of course inspiring one to build.

I began construction before the sun came up this morning.

The third plan, which suggests a harbor entrance watch tower (perhaps Italian?), is particularly compelling. I especially like the stairway turning through the building, and the sandstone arch halves used in two different orientations. And there's just enough of a bridge to win priority over the Bridge design for now.

There is a small error in the level c diagram, where a red stone at left is marked "15" but should be "19." Easily corrected when it becomes evident at the next level or blatantly obvious at the one after.

I'm not sure if this is the designers last hurrah for Set 6, since his blog has long since left me behind for bigger sets, or if we can hope for future revisits to an old favorite.

My biggest desire in plans is to see more single-box plans (actually, the only ones I've seen have been photos not plans) for the "A" boxes that are officially intended to extend a given set to the next level higher - a 6 plus a 6A makes a Set 8, add an 8A for a Set 10 - but for those of us that more often want quicker Block Play, that means that the smaller sets, the lower numbers, get satisfactory use, while the higher numbers sit neglected.

For just those rare occasions when I might be willing to tackle a three-box Set 10 construction, I can't justify an 8A, but I'd be delighted to have the opportunity to build with the different stone mix and new (to me) stones found in box 8A. That would provide a nice new and different building experience, within the familiar style and linseed-chalk-sand scent of a firm favorite among construction sets.

If you are new to Ankerstein, most folks seem to recommend starting with Set 6, except for smaller children who are better off with a Heinzelmännchen. I think that for many, set 4, followed by expansion Set 4A, to make a 6 plus a few extra stones, may be a better approach, albeit for more money and with boxes that don't conform to the 6A, etc.

If there is a better place to buy them than The ToyHouse, I don't know of it, and I'd say that even if I hadn't gotten a few freebie stones and printed materials. Woof. Please mention the Block Play blog.

Always great to be stacking Anker stones again - noting that if I hadn't had them out a few days ago, it would have taken a lot longer to get myself to try building this.

Good Block Play.